ノートアプリ「Obsidian」は標準でアウトライン機能を搭載しています。
アウトライン機能はサイドパネルで見出しを一覧表示することができる機能ですが、ノート内部に目次を作成することはできません。
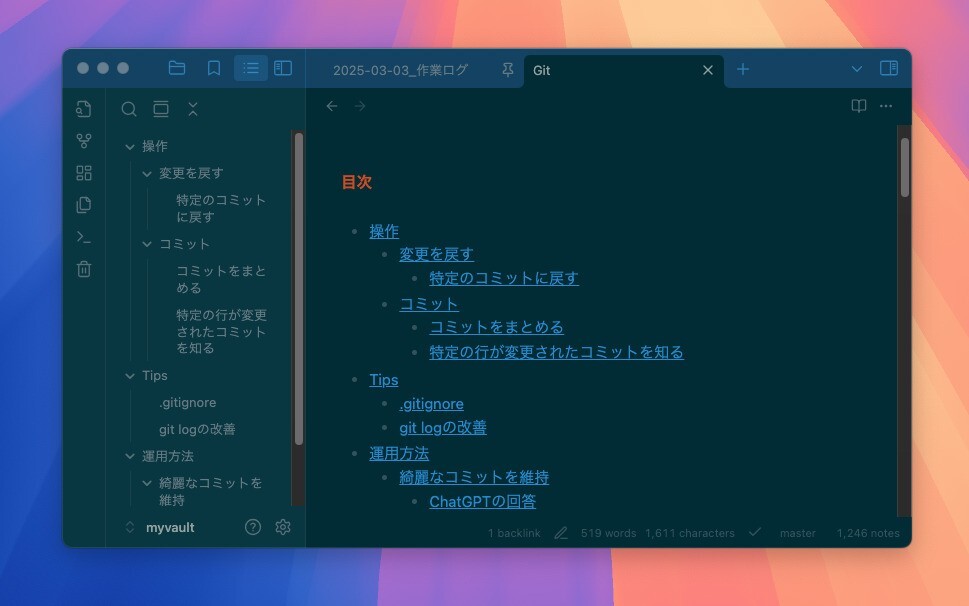
本日紹介する「Obsidian Automatic Table Of Contents」はこの機能を実現したコミュニティプラグインです。任意の場所に目次を追加することができ、ノートの内容が変更されると目次も自動で更新されます。
Obsidian Automatic Table Of Contentsの使用方法
インストールはObsidianのコミュニティプラグイン機能を利用して行います。Gitやソースコードからインストールすることもできます。

インストール後有効にし、コマンドパレット(Command+P)から「Automatic Table Of Content: Insert table of contents」あるいは「Automatic Table Of Content: Insert table of contents(with available options)」を選択し、目次を追加します。後者はタイトルやスタイルなどオプションを指定したい場合のためのものです。
すると、メモに以下のような文字列が追加され、これがプラグインによって目次に変換されます。
```table-of-contents
オプションは次のように指定します。
```table-of-contents
option1: value1
option2: value2
```
指定できるオプションは次の通りです。
| Option | デフォルト値 | 説明 |
|---|---|---|
| title | None | Title to display before the table of contents (supports Markdown) |
| style | nestedList | Table of contents style (can be nestedList, nestedOrderedList or inlineFirstLevel) |
| minLevel | 0 | Include headings from the specified level (0 for no limit) |
| maxLevel | 0 | Include headings up to the specified level (0 for no limit) |
| includeLinks | true | Make headings clickable |
| debugInConsole | false | Print debug info in Obsidian console |
特に何も指定しなくてもよい感じに表示してくれますが、例えば「目次」というタイトルをつけたい場合、次のように指定します(見出しのマークダウンも認識してくれる模様)。
```table-of-contents
title: ## 目次
```
まとめ
「Obsidian Automatic Table Of Contents」を利用すれば、自動更新される目次をノート内部に追加することができます。PukiWikiのcontentsプラグインのような感じで使うことができるため気に入っています。